วันพฤหัสบดีที่ 19 พฤษภาคม พ.ศ. 2559

Control LED from ThingSpeak

Control LED from ThingSpeak
การทดลองนี้ใช้ทำเพื่อควบคุม LED เปิดปิดไฟจาก Web Browser
อาจใช้ในการทดลองจากระยะไกล ที่เราสามารถเข้า Internet
โดยมีบัญชี  Thingspeak ก็สามารถเข้าไปควบคุมหลอดไฟ LED
ได้ครับผม
หลักการทำงานของการ ควบคุม LED ผ่าน Thing Speak ด้วย python คือ
สร้างไฟล์ python เพื่อรับค่าจากข้อมูลที่เรากรอกจากเว็บ
อย่างเช่น 
https://api.thingspeak.com/update?key=(Write_key)&field1='ค่าของตัวแปรเช่น 100'
หมายความว่า จะ Write 100 ไปที่ field1 ที่เราได้สร้างเอาไว้
เหมือนกับการ Remote ผ่าน web thingspeak ของเรา นั่นเอง
อุปกรณ์
1.Raspberry pi Board
2.LED
3.สายไฟ
4.BreadBoard
Code python ThingSpeak Control LED
import requests
import RPi.GPIO as GPIO
import time
GPIO.setmode(GPIO.BOARD)
GPIO.setup(11,GPIO.OUT)
GPIO.setup(12,GPIO.OUT)
GPIO.setup(15,GPIO.OUT)

while(True):
    r = requests.get('https://api.thingspeak.com/channels/121493/fields/1/last')
    print r.text
    if(r.text == '000'):
        GPIO.output(11,True)
        GPIO.output(12,True)
        GPIO.output(15,True)
        print "LED all Turnoff"
    if(r.text == '100'):
        GPIO.output(11,False)
        GPIO.output(12,True)
        GPIO.output(15,True)
        print "LED1 Turnon"
    if(r.text == '010'):
        GPIO.output(11,True)
        GPIO.output(12,False)
        GPIO.output(15,True)
        print "LED2 Turnon"
    if(r.text == '001'):
        GPIO.output(11,True)
        GPIO.output(12,True)
        GPIO.output(15,False)
        print "LED3 Turnon"
    if(r.text == '110'):
        GPIO.output(11,False)
        GPIO.output(12,False)
        GPIO.output(15,True)
        print "LED110 Turnon"
    if(r.text == '101'):
        GPIO.output(11,False)
        GPIO.output(12,True)
        GPIO.output(15,False)
        print "LED101 Turnon"
    if(r.text == '011'):
        GPIO.output(11,True)
        GPIO.output(12,False)
        GPIO.output(15,False)
        print "LED011 Turnon"
    if(r.text == '111'):
        GPIO.output(11,False)
        GPIO.output(12,False)
        GPIO.output(15,False)
        print "LED111 Turnon"

Result in python
Result in Field Chart

อ้างอิงจาก
http://www.instructables.com/id/An-inexpensive-IoT-enabler-using-ESP8266/step8/View-and-control-through-Thingspeakcom/
Share:

วันพุธที่ 18 พฤษภาคม พ.ศ. 2559

Google Spread Sheet Temperature with python Raspberry pi

Google Spread Sheet Temperature with python Raspberry pi
การทดลองนี้เพื่อส่งค่าอุณหภูมิจาก Raspberry Pi เข้าไปเก็บไว้
ใน Google Spread Sheet ที่เราสร้างไว้

อุปกรณ์การทดลอง

1.Raspberry pi Board
2.สาย LAN สำหรับ Remote จาก PC
3.Resistor 10k
4.DS18B20 sensor

ขั้นตอนการเตรียมการ

$ sudo apt-get install python-smbus
$ sudo apt-get install i2c-tools
$ sudo raspi-config
Select "Advanced Options"
Select "I2C"
Select "Yes"
Select "Yes"

$ sudo apt-get update
$ sudo apt-get install python-pip
$ sudo pip install gspread oauth2client
$ sudo apt-get install python-openssl

Exception Can't install oauth2client

หากเจอปัญหา ไม่สามารถลง oauth2client ได้
แก้ไขได้โดย $ sudo python -m pip install --upgrade --force setuptools $ sudo python -m pip install --upgrade --force pip
อ้างอิงจาก link นี้

เตรียม OAuth.json download จาก Window แล้วนำไปใส่ใน Rpi

(1.)ไปยัง https://console.developers.google.com และ log in Google IDของท่าน
(2.)เลือก Create Credential -> OAuth client ID
(3.)เลือก Other แล้วตั้งชื่อ
(4.)Enable APi เพื่อให้สามารถเข้าถึง Google sheetได้
(5.)คลิก Download JSON จะได้ ไฟล์ .JSON มา แล้วนำไปไว้ใน RPi

เข้าไปสร้าง Google Sheet

สร้างไฟล์และตั้งชื่อ ตัวอย่างเช่น tempDS18B20

เตรียมการเรียบร้อย

ลุยโค้ดเลยจร้า


Code python for live temperature google sheet

import os
import glob
import time
import datetime
import gspread
from oauth2client.service_account import ServiceAccountCredentials

scope = ['https://spreadsheets.google.com/feeds']

credentials = ServiceAccountCredentials.from_json_keyfile_name('My Project Raspberry-8d52fa6a989c.json', scope)

gc = gspread.authorize(credentials)

wks = gc.open("tempDS18B20").sheet1         #ชื่อไฟล์ต้องตรงกับที่สร้างไว้ใน Google Sheet

os.system('modprobe w1-gpio')
os.system('modprobe w1-therm')

base_dir = '/sys/bus/w1/devices/'

device_folder = glob.glob(base_dir + '28*')[0]
device_file = device_folder + '/w1_slave'

def read_temp_raw():
        f = open(device_file, 'r')
        lines = f.readlines()
        f.close()
        return lines

def read_temp():
        lines = read_temp_raw()
        while lines[0].strip()[-3:] != 'YES':
                time.sleep(0.2)
                lines = read_temp_raw()
        equals_pos = lines[1].find('t=')
        if equals_pos != -1:
                temp_string = lines[1][equals_pos+2:]
                temp_c = float(temp_string) / 1000.0
                temp_f = temp_c * 9.0 / 5.0 + 32.0
                return temp_c

        
while True:
        x = 0
        temp_c = read_temp()
        times = datetime.datetime.strftime(datetime.datetime.now(), '%Y-%m-%d %H:%M:%S')
        for values in wks.col_values(1):
                x = x + 1
        rowToAdd = [times,temp_c]
        wks.resize(x)
        wks.append_row(rowToAdd)
        print"temperature = " + str(read_temp())
        time.sleep(0.3)


Result:


Share:

วันอังคารที่ 17 พฤษภาคม พ.ศ. 2559

Connecting Webcam with Raspberrypi by python

Connecting Webcam with Raspberrypi by python
การทดลองนี้ เพื่อทดสอบการติดต่อกล้อง Webcam กับ
บอร์ด Raspberry Pi ว่าสามารถใช้งานได้หรือไม่?

อุปกรณ์ที่ใช้

1.Raspberry Pi Board
2.Webcam Camera (USB)
3.สายLan สำหรับ Remote Desktop

Install Program ที่จำเป็น
$sudo apt-get install  python-opencv

Code python Webcam with Raspberrypi

อ้างอิงมาจาก https://learninginventions.org/?page_id=1163
import cv
import datetime
import RPi.GPIO as GPIO                           
import time   
GPIO.setmode(GPIO.BOARD)                                                                  
                           
print "Waiting for sensor to settle"    
print "Detecting motion"
 
# ---------------------------
# Setup the webcam and font
# ---------------------------
 
# define image size
imageWidth = 640
imageHeight = 480
 
# create a window object
cv.NamedWindow("window1", cv.CV_WINDOW_AUTOSIZE)
camera_index = 0
 
# create a camera object
capture = cv.CaptureFromCAM(camera_index)
 
# set capture width and height
cv.SetCaptureProperty( capture, cv.CV_CAP_PROP_FRAME_WIDTH, imageWidth );
cv.SetCaptureProperty( capture, cv.CV_CAP_PROP_FRAME_HEIGHT, imageHeight );
 
# create a font
font = cv.InitFont(cv.CV_FONT_HERSHEY_COMPLEX_SMALL , 0.5, 0.5, 0, 1, cv.CV_AA)
i = 0
while True:
     
    # get image from webcam
    frame = cv.QueryFrame(capture)
 
    # -------------------------------------------
    # Draw the time stamp on a white background
    # -------------------------------------------  
    cv.Rectangle(frame, (0,0), (imageWidth, 15), (255,255,255),cv.CV_FILLED,8,0)
    # get the current date and time
    timeStampString = datetime.datetime.now().strftime("%A %Y-%m-%d %I:%M %p")
    # insert the date time in the image
    cv.PutText(frame, timeStampString, (10,10), font, (0,0,0))
 
    # -----------------------------
    # show the image on the screen
    # -----------------------------
    cv.ShowImage("window1", frame)
 
    # -----------------------
    # wait for user command
    # -----------------------
    command = cv.WaitKey(10)
 
    # if press 'q' -> exit program
    if command == ord('q'):
        print "Ending program"
        break  # end program
 
    # if press 's' -> save the image
    elif ((command == ord('s'))):
        print "Saving image"
        cv.SaveImage("test_%d.jpg" %i ,frame)
        time.sleep(5)
        i=i+1

ผลการทดลอง(Result):

จากผลการทดลองจะเห็นว่าจะมีตัวหนังสือที่ปรากฎบนหน้าจอกล้อง
Share:

วันจันทร์ที่ 16 พฤษภาคม พ.ศ. 2559

Dropbox Image Storage Webcam Connection Raspberry pi python

Dropbox Image Storage Webcam Connection Raspberry pi python
การทดลองนี้เพื่อทดลอง ถ่ายภาพจาก Raspberry Pi เพื่อส่ง
เข้าไปยัง Dropbox ของเรา เพื่อเก็บภาพได้โดยง่ายครับ
อุปกรณ์
1.บัญชี Dropbox
2.กล้อง Webcam(USB)
3.Raspberry pi Board

ขั้นตอนการเตรียมการ Dropbox

อ้างอิงจาก -> https://github.com/andreafabrizi/Dropbox-Uploader

$ sudo git clone https://github.com/andreafabrizi/Dropbox-Uploader.git
$ cd Dropbox-Uploader
$ sudo chmod +x dropbox_uploader.sh
$ sudo ./dropbox_uploader.sh
เข้ามาที่ https://www.dropbox.com/developers และ log in เข้า Dropbox ของตนเอง
เลือกDropbox Api -> App folder -> ตั้งชื่อให้เรียบร้อย
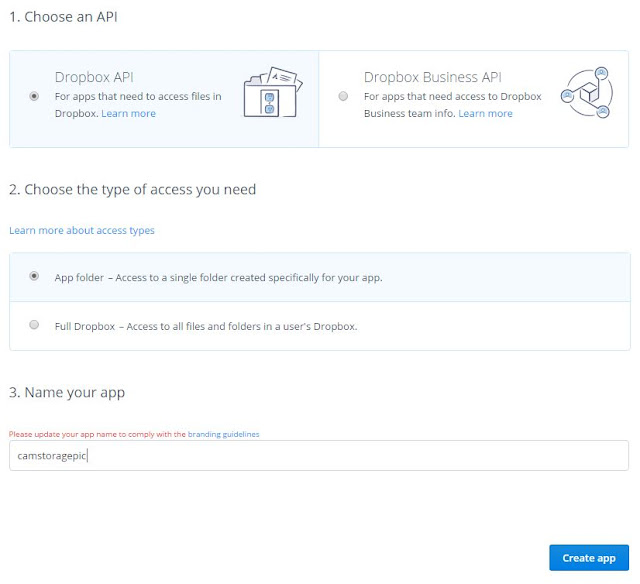

เลือก หน้าถัดมาจะได้ App key กับ App Secrets


เข้า link ของ Dropbox ที่ได้มา และ กด Allow -> ถ้าสำเร็จ จะแสดงผลดังภาพ

Code Dropbox

import cv
import datetime
import RPi.GPIO as GPIO                           
import time
import commands
from subprocess import call
GPIO.setmode(GPIO.BOARD)                          
pir = 7                                         
GPIO.setup(pir, GPIO.IN)                           
print "Waiting for sensor to settle"    
print "Detecting motion"
 
# ---------------------------
# Setup the webcam and font
# ---------------------------
 
# define image size
imageWidth = 320
imageHeight = 240
 
# create a window object
cv.NamedWindow("window1", cv.CV_WINDOW_AUTOSIZE)
camera_index = 0
 
# create a camera object
capture = cv.CaptureFromCAM(camera_index)
 
# set capture width and height
cv.SetCaptureProperty( capture, cv.CV_CAP_PROP_FRAME_WIDTH, imageWidth );
cv.SetCaptureProperty( capture, cv.CV_CAP_PROP_FRAME_HEIGHT, imageHeight );
 
# create a font
font = cv.InitFont(cv.CV_FONT_HERSHEY_COMPLEX_SMALL , 0.5, 0.5, 0, 1, cv.CV_AA)
i = 0
while True:
     
    # get image from webcam
    frame = cv.QueryFrame(capture)
 
    # -------------------------------------------
    # Draw the time stamp on a white background
    # -------------------------------------------  
    cv.Rectangle(frame, (0,0), (imageWidth, 15), (255,255,255),cv.CV_FILLED,8,0)
    # get the current date and time
    timeStampString = datetime.datetime.now().strftime("%A %Y-%m-%d %I:%M %p")
    # insert the date time in the image
    cv.PutText(frame, timeStampString, (10,10), font, (0,0,0))
 
    # -----------------------------
    # show the image on the screen
    # -----------------------------
    cv.ShowImage("window1", frame)
 
    # -----------------------
    # wait for user command
    # -----------------------
    command = cv.WaitKey(10)
 
    # if press 'q' -> exit program
    if command == ord('q'):
        print "Ending program"
        break  # end program
 
    # if press 's' -> save the image
    elif ((command == ord('s'))):
        print "Saving image"
        cv.SaveImage("test.jpg",frame)
        photofile = "Dropbox-Uploader/dropbox_uploader.sh upload test.jpg test.jpg"
        call ([photofile], shell=True)
        time.sleep(5)
        i=i+1

ผลลัพธ์ ใน Dropbox :

สำเร็จเสร็จเรียบร้อย!
Share:

วันอาทิตย์ที่ 15 พฤษภาคม พ.ศ. 2559

Raspberry pi (Rpi) Webcam Detect PIR Upload to facebook by python

Raspberry pi (Rpi) Detect PIR Upload to facebook by python

อุปกรณ์ที่ใช้ทดการทดลอง

1.Raspberry pi Board
2.PIR sensor
3.กล้อง Webcam camera
4.สายไฟ Jumper
5.สาย LAN

ขั้นตอนการเตรียมการ

Link to Github fbconsole
ตอนนี้อยู่ใน directory /home/pi/
1.ทำการ install fbconsole
sudo apt-get update sudo apt-get upgrade sudo apt-get install python sudo apt-get install python-opencv sudo pip install fbconsole
2.ทำการเตรียม Facebook APP_ID และ ACCESS_TOKEN
(2.1)เข้าไปที่ลิงค์ https://developers.facebook.com และ log in ด้วย Facebook ของตนเอง
(2.2)เลือก Add a New App จะได้หน้าต่างขึ้นมาดังภาพ
-เลือกไปที่ Website
(2.3)ตั้งชื่อ Project ของผมตั้งชื่อเป็น "cameraembedded" ชื่อโปรเจคจะเป็นชื่อของผู้โพสต์ภาพบน Facebook
-Tell us about Web site ให้กรอก link ของ Website ที่เราต้องการจะนำไปแสดงในส่วนของผู้โพสต์ภาพ -หากไม่มี website เป็นของตนเอง ในขั้นตอนที่ 2.2 ให้เลือกเป็น basic setup
(2.4)มาที่หน้า Dashboard จะปรากฏ APP_ID ขึ้นมา
(2.5)ไปยังหน้า developers.facebook.com
-Application: เลือกชื่อ project ที่เรา ต้องการทำ -Access Token: เลือก Get User Access Token
(2.6)เลือก Data Permission ตามที่ต้องการใช้งาน
-ยืนยัน Get access token
(2.7)ทำการ Submit เพื่อยืนยัน และจากนั้นให้ Save session
(หากไม่ Save session จะทำให้เมื่อเราไม่ได้ทำการใช้งาน Access Token แล้ว Facebook จะทำการ Gen Acess Token ใหม่ ไม่สามารถใช้Access Token ที่ไม่ได้ Save session ไว้ได้)

Code in Rpi to Upload to Facebook

import cv
import datetime
import RPi.GPIO as GPIO                           
import time
import commands
import fbconsole
from subprocess import call
GPIO.setmode(GPIO.BOARD)                          
pir = 7                                         
GPIO.setup(pir, GPIO.IN)                           
print "Waiting for sensor to settle"    
print "Detecting motion"

fbconsole.ACCESS_TOKEN = 'Insert Your Access token'   #<-----------Your Access Token
fbconsole.APP_ID = 'Insert Your APP_ID'    #<------------------Your APP_ID
fbconsole.authenticate()
# ---------------------------
# Setup the webcam and font
# ---------------------------
 
# define image size
imageWidth = 320
imageHeight = 240
 
# create a window object
cv.NamedWindow("window1", cv.CV_WINDOW_AUTOSIZE)
camera_index = 0
 
# create a camera object
capture = cv.CaptureFromCAM(camera_index)
 
# set capture width and height
cv.SetCaptureProperty( capture, cv.CV_CAP_PROP_FRAME_WIDTH, imageWidth );
cv.SetCaptureProperty( capture, cv.CV_CAP_PROP_FRAME_HEIGHT, imageHeight );
 
# create a font
font = cv.InitFont(cv.CV_FONT_HERSHEY_COMPLEX_SMALL , 0.5, 0.5, 0, 1, cv.CV_AA)
while True:
     
    # get image from webcam
    frame = cv.QueryFrame(capture)
 
    # -------------------------------------------
    # Draw the time stamp on a white background
    # -------------------------------------------  
    cv.Rectangle(frame, (0,0), (imageWidth, 15), (255,255,255),cv.CV_FILLED,8,0)
    # get the current date and time
    timeStampString = datetime.datetime.now().strftime("%A %Y-%m-%d %I:%M %p")
    # insert the date time in the image
    cv.PutText(frame, timeStampString, (10,10), font, (0,0,0))
 
    # -----------------------------
    # show the image on the screen
    # -----------------------------
    cv.ShowImage("window1", frame)
 
    # -----------------------
    # wait for user command
    # -----------------------
    command = cv.WaitKey(10)
 
    # if press 'q' -> exit program
    if command == ord('q'):
        print "Ending program"
        break  # end program
 
    # if press 's' -> save the image
    elif ((command == ord('s'))|(GPIO.input(pir)==1)):
        print "Saving image"
        cv.SaveImage("test.jpg",frame)
        fbconsole.post('/me/photos',{'name':'ENEMY Detect!','source': open('test.jpg')})
        time.sleep(5)
   

Result เมื่อรันโปรแกรม:

โปรแกรมที่แสดงผลในบอร์ด Raspberry pi
ส่วนที่โปรแกรมแสดงผลใน Facebook

อ้างอิงจาก

ขอบคุณทุกๆเว็บไซต์ครับ หากเป็นไปได้ผมจะพัฒนาโดยนำ Qt มาใช้กับ python file ด้วยครับ
และหวังว่า Project นี้จะเป็นประโยชน์ครับ
https://github.com/fbsamples/fbconsole
PIR-detect
http://pantip.com/topic/33726523
http://www.pontikis.net/blog/auto_post_on_facebook_with_php
https://learninginventions.org/?page_id=1163
Share:

วันเสาร์ที่ 14 พฤษภาคม พ.ศ. 2559

Raspberry pi send Temperature to MQTT

ทดลองเพื่อทำการส่งค่า อุณหภูมิขึ้นไปบน MQTT.ORG
ว่าใช้งานได้จริงหรือไม่?
อุปกรณ์
1. Raspberry Pi 2 Model B+     
2. DS18B20 Sensor             
3. Resistor 10k          
4. สายไฟ                    
5. wired Lan  (Cross) 
ขั้นตอนในการใช้งาน
1. ขั้นแรกให้สร้าง Things ขึ้นมา โดยตั้งชื่อว่า Thermometer  
2. สร้าง Events ขึ้นมาโดยให้ชื่อว่า temperatureChanged และเป็นตัวแปรชนิด float
3.สร้าง Triggers ขึ้นมา
4. กดปุ่ม "Edit Script" เพื่อสั่งให้ส่งอีเมลล์ไปหาเราถ้าอุณหภูมิถึงเกณฑ์ที่กำหนด แก้อีเมลล์ให้เป็นของคุณ function onEvent(event){ if(event.value>20){ smtp.send("YourEmail@gmail.com", "temperature is high! Temp is: "+ event.value + " celsius") } }
5. สร้าง API สำหรับเชื่อมต่อระหว่าง RPi กับ GadgetKeeper
DOWNLOAD git clone https://github.com/peoplezx/gadgetKeeper.git 6. ให้เราเพิ่มสิทธิ์ให้ไฟล์ sudo chmod 777 -R gadgetKeeper 7. ทดสอบ จากนั้นทดสอบเซ็นเซอร์ของเราว่าใช้ได้ไหม โดยต่อข้อมูลที่ขา 4 cd gadgetKeeper sudo python read_temperature.py ผลการทดสอบ
จากนั้นให้นำ Key จากเว็บ Gadget ไปใส่ในไฟล์ event_trigger.sh sudo nano event_trigger.sh
เซฟและออกจาก text editor สั่งรันทดสอบโปรแกรม ./event_trigger.sh update-T เราจะได้ผลลัพธ์ตอบกลับมา
ให้เราเข้าไปดูที่เว็บ http://api.gadgetkeeper.com/ สังเกตตรง Log ข้างล่าง จะมีการอัพเดต
ลองเช็ค E-mail ที่ใส่ไว้ในสคริปต์ ก็จะเห็นว่า gadgetkeeper ได้ส่งข้อมูลมาเตือนเราว่าอุณหภูมิสูงเกินค่าที่ตั้งไว้ อัพเดตค่าอัตโนมัติ เราจะสั่งให้อัพเดทค่าเซ็นเซอร์ไปที่ Gadgetkeeper ทุกนาที sudo crontab -e #Add this line to cron * * * * * /home/pi/gadgetKeeper/event_trigger.sh "update-T"
Share: